
Even as 3D printing technology continues to advance, there are still limitations as to the availability of detailed color 3D prints. The best commercially available 3D printers use binder-jetting (where colored ink is used in the construction process of the object), which results in a fuzzy, diluted image on the object’s surface.
As an alternative, it may be possible to create 3D prints with detailed surface color by pasting 2D printed images onto the surface of mono-color objects. In order to turn flat, 2D images into shapes that can fit onto uneven 3D forms, I created a program that would alter the proportions of the image so that it can be printed, cut, and pasted in such a way that the image will be evenly displayed over the 3D object.
right: original image; left: image morphed to fit orb

below: test pasting image onto orb

below: 3D printing tests, using symmetrical shapes

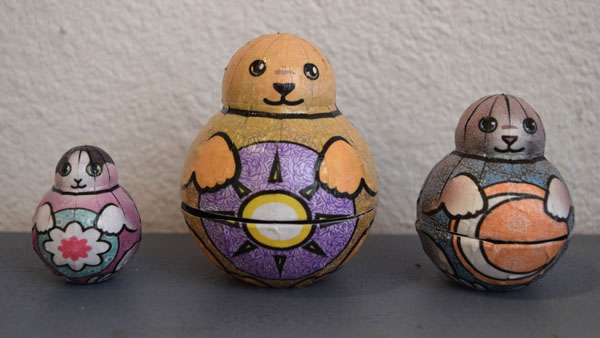
below: 3D prints – symmetrical shapes and Russian nesting doll prototypes after paper images are glued onto them

Workshop
In order to get outside perspective on whether this approach would be feasible for an average user, we held a small workshop in order to gather feedback. For this case, the workshop attendees would be evaluating the process of cutting out images and pasting them onto the prints. The actual 3D printed models were printed ahead of time (since the 3D printing process can take too long for the span of a workshop). All workshop participants were presented with a set of 3 Russian nesting dolls, and were requested to bring in their own image files to be pasted onto the objects.
below: example set of 3D printed Russian nesting dolls and printed paper images before images are cut and applied to dolls

below: workshop pictures


Results
On Cutting Out Paper Shapes – workshop attendees could choose between using scissors or exacto-blade. While all the attendees were able to cut out the shapes, some found the process tedious. Based on this feedback, future endeavors will focus on using laser cutters or similar tools to cut out paper and avoid unnecessary human labor.
On Pasting Paper onto 3D Forms – participants varied how they applied the paper onto the 3D prints. Some brushed the paper with gel medium before applying it to the 3D form, while others lathered the 3D form with gel medium before applying the paper. Both approaches were successful, though it seems applying the gel medium directly to the 3D form was faster.
below: if an extra layer of gel medium is not put on top of the paper, it does not have a glossy finish. While some attendees preferred the matte finish, it does leave the exposed paper at greater risk of abrasion or damage. By using an alternative gel with a matte finish, it may be possible to provide protection to the paper while not giving the object a glossy finish.

The results of applying the paper to the 3D prints were mostly successful. However, in some cases the paper ended up crinkled or not correctly matched up. For participants who completed multiple Russian Nesting Dolls, the results appeared smoother after their first attempt.


Certain types of printed images hid the cuts in the paper better than others. Generally, large areas of a single color (especially white) clearly displayed where the paper had been cut. In contrast, designs with bold and complex patterns mask the location of the paper cuts.
below: large white area clearly shows where cuts in the paper occurred

below: bold and complex patterns make the paper cuts much less visible

The most consistent problem was applying the paper in such as way that the “head” was completely covered. For many, this resulted in the black 3D print being visible between the strips of paper.
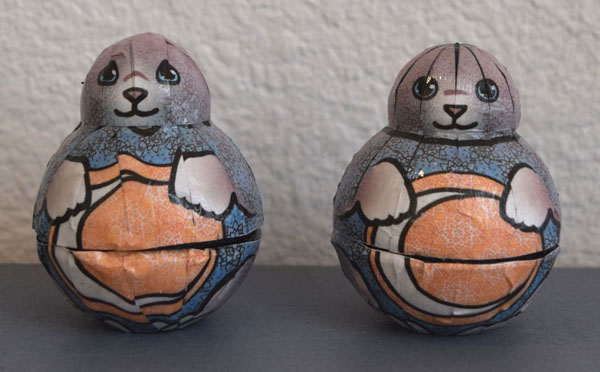
As a potential alternative, we used a different algorithm that would allow the paper to be cut into rectangular strips, as opposed to the curving triangles in the previous models. While this did allow the paper to completely cover the form, the extra overlapping pieces of paper made gluing more difficult. In addition, a fault in the algorithm caused additional warping of the image. Overall, the curving-triangle method appears more successful, although an extra buffer of paper should be added to the design so that the paper will completely cover the form.
left: Paper cut into strips. Overlapping pieces of paper bunch up slightly. No underlying part of the underlying object is exposed.
right: Paper cut into curved triangle shapes. Near the head, part of the underlying object is exposed.
Participants in the study suggested many possible uses for this technique, including fine art pieces (such as vases), figurines & game pieces, and biological medical models.
Going forward, we are looking to expand the capabilities of the program, so that it will be capable of morphing images to more complicated 3D models. Ideally, this would allow a user to design a complex form in the program and then map a 2D image onto it.
